Service Manager
Setting Up Languages
You can set the languages available for your users from the Languages workspace in the Configuration Console.
•Available Languages and Cultures
•Setting the Default Language for a New User
•Defining Language Availability
•Deleting a Language and Culture
•Adding a Language and Culture with Translations
•Adding a Language and Culture Without Translations
Available Languages and Cultures
•About the Available Languages and Cultures
•Supported Languages and Cultures with Translations
•Supported Languages and Cultures Without Translations
About the Available Languages and Cultures
Service Manager provides a full translation for some languages and supports several other languages. Support means that you can add the language to Service Manager but you must use the translation tools to provide the translations for your language.
A culture comprises the language, number formats, currency symbols, and country specific settings. For Service Manager, the words culture and language are used interchangeably.
The format for the culture name is the two-letter language code in lower case and the two-letter subculture code in upper case. Examples include ja-JP for Japanese (Japan) and en-US for English (United States). In cases where a two-letter language code is not available, a three-letter code derived from ISO 639-2 is used.
Supported Languages and Cultures with Translations
The following table lists the languages and associated culture codes that are supported in Service Manager, and also lists which languages are fully translated out-of-the-box.
| Language | Country | Culture Code | Translated |
|---|---|---|---|
|
Chinese Simplified (PRC) |
China |
zh-CN |
Yes |
| Dutch | Netherlands | nl-NL | Yes |
| English | Australia | en-AU | Yes |
| English | Canada | en-CA | Yes |
| English | Ireland | en-IE | Yes |
| English | New Zealand | en-NZ | Yes |
| English | South Africa | en-ZA | Yes |
| English | United Kingdom | en-GB | Yes |
| English | United States | en-US | Yes |
|
French |
France |
fr-FR |
Yes |
| German | Germany | de-DE | Yes |
|
Italian |
Italy |
it-IT |
Yes |
| Japanese | Japan | ja-JP | Yes |
| Portuguese | Brazil | pt-BR | Yes |
| Russian | Russia | ru-RU | Yes |
| Spanish | Spain | es-ES | Yes |
|
Polish |
Poland |
pl-PL |
Yes |
Supported Languages and Cultures Without Translations
The following table lists the languages and associated culture codes that are supported in Service Manager, but require you to provide the translation.
| Language | Country | Culture Code | Translated |
|---|---|---|---|
| Bulgarian | Bulgaria | bg-BG | No |
| Chinese Traditional | Taiwan | zh-TW | No |
| Croatian | Croatia | hr-HR | No |
| Czech | Czech Republic | cs-CZ | No |
| Danish | Denmark | da-DK | No |
| Estonian | Estonia | et-EE | No |
| Finnish | Finland | fi-FI | No |
| Greek | Greece | el-GR | No |
| Hungarian | Hungary | hu-HU | No |
| Korean | Korea | ko-KR | No |
| Latvian | Latvia | lv-LV | No |
| Lithuanian | Lithuania | lt-LT | No |
| Norwegian (Bokmal) | Norway | nn-NO | No |
| Portuguese | Portugal | pt-PT | No |
| Romanian | Romania | ro-RO | No |
| Serbian (Latin) | Serbia | sr-RS | No |
| Slovak | Slovakia | sk-SK | No |
| Slovenian | Slovenia | sl-SI | No |
| Spanish | Mexico | es-MX | No |
| Swedish | Sweden | sv-SE | No |
| Thai | Thailand | th-TH | No |
| Turkish | Turkey | tr-TR | No |
| Ukrainian | Ukraine | uk-UA | No |
Setting the Default Language for a New User
You can set the default language for a new user. This becomes the default language for the user and displays when the user initially logs in.
Follow these steps to set the default language for a new user:
1.From the Configuration Console, click Configure > Users and Permissions > Users. The application displays the Users workspace.
2.Open the new user record.
3.Click the Details tab.
4.In the Language field in the Organizational Information section, select a language from the drop-down list.
5.Click Save.
If a user logs in to a new machine, the application displays their original default language even if their default language has recently changed.
Defining Language Availability
Follow these steps to specify the available locales that you can select. You can add additional languages by following the steps in Adding a Language and Culture with Translations.
1.From the Configuration Console, click Configure > Organizational Profile > Languages to open the Languages workspace.
Languages Workspace
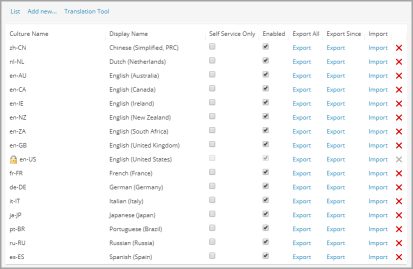
2.To enable a language for all roles, check Enabled next to it.
The application automatically saves your settings and makes the locale selections available to users.
Deleting a Language and Culture
You can delete a language and culture in Service Manager; however, although it appears that the language and culture is removed, there are still a large number of columns associated with that language and culture that remain in the database.
1.From the Configuration Console, click Configure > Organizational Profile > Languages to open the Languages workspace.
2.To disable a language and culture for all roles, click the delete icon  next to it.
3.In the confirmation message dialog box, click Yes.
Adding a Language and Culture with Translations
Follow these steps to add a language and culture that has translations. See Supported Languages and Cultures with Translations.
Only add the languages and cultures that your organization actively uses. Selecting additional languages and cultures expands the database with additional fields that cannot be completely removed even if you disable the language and culture at a later time.
1.From the Configuration Console, click Configure > Organizational Profile > Languages to open the Languages workspace.
2.Click Add new.... The application displays a list of additional languages and cultures.
3.Select the language and culture to add. The application automatically saves your option and includes it in the Language workspace.
4.Return to the Languages workspace and click Refresh to verify that your selection was added to the list.
The application automatically checks Enabled for the new language and culture, which enables the new language and culture for all roles.
Adding a Language and Culture Without Translations
Many more cultures are supported in Service Manager than have been translated. See Supported Languages and Cultures Without Translations. If you choose one of the supported languages and cultures without translations, you must supply the translation.
This export and import process only provides translations for metadata. It does not provide translations for resource files. Also, this process does not include validation list data, roles, desktops, and dashboard charts.
1.From the Configuration Console, click Configure > Organizational Profile > Languages to open the Languages workspace. The Languages workspace appears with a list of default languages (culture names).
2.Click Add new.... The application displays the list of additional languages and cultures.
3.Select the language and culture to add. The application adds the new language and culture.
Adding a New Language and Culture
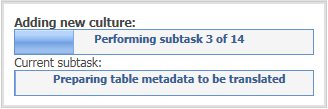
This process takes a few minutes. When the application finishes adding the language and culture, it displays a Success dialog box.
4.Click OK.
5.Return to the Languages workspace and under Export All, click Export.
The application creates a spreadsheet. Depending on your browser configuration, the application saves the spreadsheet in the default download folder or in a folder that you specify.
The spreadsheet file name includes the name of the target language. For example, the name might be Translation (All) of Greek (Greece),xlsx
Example of a Translation Spreadsheet.
![]()
6.Deliver this spreadsheet to your translator.
The translator translates the text strings into the target language and then returns the spreadsheet to you.
7.Go to the Languages workspace, and beside the language and culture that you added, click Import to import the spreadsheet with the translated values.
This process takes a few minutes. When the application is done importing the spreadsheet, it displays a Success dialog box.
Was this article useful?
Copyright © 2019, Ivanti. All rights reserved.